

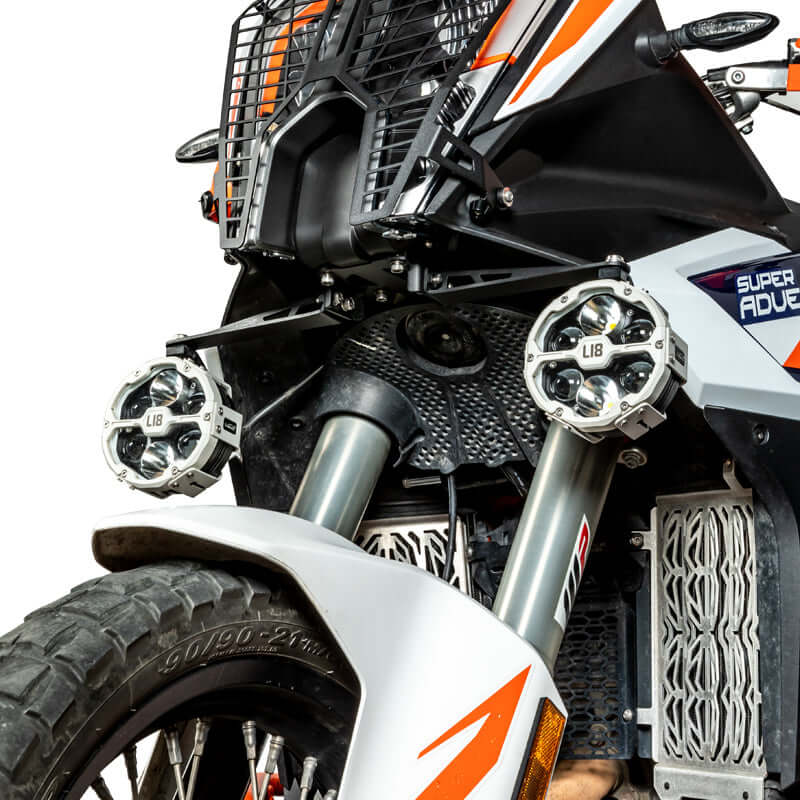
In brief. Auxiliary lights can be mounted in three positions: on the crash bars (protected, low beam), under the headlight assembly (better projection, more exposed), or on a dedicated bar under the headlight (when the bike offers no mounting points). More important than the position is the type of anchoring: a universal collar holds by friction and rotates with vibrations, while a dedicated mount bolts to an existing hole and stays aligned.
Here you'll find the LOBOO mount specifications for BMW GS Adventure and KTM Adventure, the tube diameter to check before buying the auxiliary light, the control to install on the BMW clutch lever, and how to adjust the beam. Prices and availability were checked in the Endurrad catalog on October 3, 2026.
The problem isn't the weak bracket; it's the type of anchoring
Choosing the auxiliary lights is the easy part. The trouble starts when you look for somewhere to attach them: the fairing offers no mounting points, and the improvised solution is universal collars and zip ties. It works for two hundred kilometers, then the beam points somewhere else and you notice it at night.
Resting against it isn't bolting it on
A universal collar clamps around the tube: it holds by friction. High-frequency vibrations work directly against friction, and no tightening torque can solve this permanently. In fact, tightening more on a thin-walled tube risks deforming it into an oval.
A dedicated mount attaches to a hole: it replaces an existing screw or attaches to the points specified by the manufacturer. The auxiliary light is mechanically fixed and cannot rotate, because there is nothing around which it can rotate.
| Appearance | Universal collar | Dedicated mount |
|---|---|---|
| How it holds | Friction around the tube | Screw in an existing hole |
| With vibrations | Tends to rotate; the beam shifts | It stays fixed; the alignment doesn't change |
| Compatibility | Wide range, depending on the diameter | Specific to model and year |
| Reversibility | Yes, but it may mark the tube | Yes, the bike returns to stock |

Three possible positions, three different compromises
Each position changes the protection in a fall and the shape of the beam. There is no absolute best: there is the one your motorcycle makes possible without modifications.
| Position | Pros | Cons | Catalog example |
|---|---|---|---|
| Engine guard bars | The most protected: in a fall, the auxiliary light stays behind the bar. It illuminates the edge and nearby dips well | Low beam, less depth | LOBOO CWJ082, BMW R 1200/1250 GS Adventure |
| Below the headlight assembly | Better projection angle for night riding, the beam reaches farther | More exposed in a frontal fall | LOBOO CDZJ251, KTM 1290 Super Adventure R |
| Dedicated bar below the headlight | Creates a mounting point where the motorcycle has none. Tube of known size | Extra piece, year compatibility | LOBOO CWJ221, KTM 790 Adventure / R |

On the engine guard bars: BMW R 1200 and R 1250 GS Adventure
The CWJ082 is a straightforward example of hole mounting: two through spacers installed on the original BMW engine guard bar in place of the original bolt. It does not clamp anything; when removed, the bar returns to its original condition.

- Type
- 2 through spacers
- Diameter
- Ø 25 mm
- Material
- CNC aluminum
- Mounting
- In place of the original bolt
- Compatibility
- Original BMW R 1200 GS Adv and R 1250 GS Adv engine guard bar
- Included
- Brackets and screws; auxiliary lights and wiring excluded
Below the headlight assembly: KTM 1290 Super Adventure R
The CDZJ251 positions the auxiliary lights at headlight height, where they project the farthest. The black electrostatically sandblasted textured finish does not chip like paint, and the swivel joint allows the angle to be corrected after installation.

- Material
- SUS304 stainless steel
- Finish
- Electrostatically sandblasted black
- Weight
- 515 g
- Width
- approximately 429 mm
- Adjustment
- Swivel
- Compatibility
- KTM 1290 Super Adventure R from 2022 onward
On a dedicated bar: KTM 790 Adventure and 790 Adventure R
Where there is no convenient mounting point, one is created. The CWJ221 is a stainless steel crossbar secured to the motorcycle's anchoring points, without drilling, providing a 22 mm tube just below the headlight. The included adapter bracket also accepts screw-mounted auxiliary lights.

- Material
- 304 stainless steel
- Tube
- Ø 22 mm below the headlight
- Adapter
- Included, for screw-mounted auxiliary lights
- Adjustment
- Pivoting axis
- Drilled holes
- None
- Compatibility
- KTM 790 Adventure and 790 Adventure R 2019-2022
Other mounts in the catalog, for other motorcycles
| Mount | Motorcycle | Price | Availability as of 10/3/2026 |
|---|---|---|---|
| LOBOO CDJ082C (upper, below the beak) | BMW R 1200 / R 1250 GS Adventure | 73 € | Sold out |
| DENALI LAH0711800 (lower) | BMW R 1300 GS | 64,20 € | Sold out |
| DENALI LAH0711600 (upper) | BMW R 1300 GS | 109,14 € | Sold out |
| DENALI LAH0711901 | BMW R 1300 GS Adventure | 148,77 € | Sold out |
| DENALI LAH0610200 | Yamaha Ténéré 700 2019-2024 | 112,98 € | Sold out |
| DENALI LAH0110300 | Honda Africa Twin CRF1000L | 127,11 € | Sold out |
As of October 3, all DENALI model-specific mounts are sold out: the complete list, with compatibility by brand and year, is in the DENALI mounts and brackets collection.
The tube diameter determines which auxiliary light will fit
The auxiliary-light clamp and the tube it is mounted on must match in size. It's the check done last, but it should be done first.
22 mm is common, not universal
LOBOO builds the CWJ221 around a Ø 22 mm tube and identifies it as the size used by much of the auxiliary-light market. But crash bars vary in diameter from motorcycle to motorcycle, and the clamps adapt accordingly: DENALI, for example, produces universal clamps for bars from 32 to 38 mm and from 39 to 49 mm.
A bracket that offers a standard-size tube, plus an adapter for screw mounting, does not tie you to the brand of auxiliary lights you choose today. That's the practical advantage of a dedicated bar.
- Measure the circumference of the tube where you want to mount the auxiliary light, using a tape measure or a strip of paper.
- Divide by 3.14: you get the diameter. A circumference of 69 mm corresponds to approximately 22 mm.
- Compare it with the clamp range stated by the auxiliary-light manufacturer before ordering.

The control goes under your thumb, not on the handlebar
Once the auxiliary lights are mounted, they still need to be switched on. An added handlebar switch forces you to look for it or shift your grip, and at night or on difficult terrain, that's the worst time to do so.
The LOBOO CLU081 clutch lever puts the control where your hand already is: the switch is built into the lever body, with the semi-recessed ring reachable by your thumb. It replaces the standard lever, with no drilling or additional hardware. Complete details are available in the guide to the BMW clutch lever with spotlight control.

- Functions
- Low beam, high beam, passing
- Brightness
- 8 levels, white/yellow
- Levers
- Short 200.7 mm, long 218 mm
- Travel
- Adjustable to 4 positions
- Material
- Anodized CNC aluminium
- Weight
- 109 g with short lever
- you have a BMW R 1200 or R 1250 GS, GS Adventure, RT, RS or R
- you have a BMW K 1600 series
- you want to control the spotlights without taking your hand off
- is not specified for the BMW R 1300 GS
- does not include the spotlight: LOBOO specifies it for the L18 spotlight
- does not replace the spotlight wiring

Adjustment is carried out in the dark, with you on the seat
It's the final mistake, and almost everyone makes it: aiming the beam in the garage while looking at the wall. Then the first night ride reveals that the spotlights illuminate the guardrail or dazzle oncoming traffic.
- Motorcycle in riding position, with your usual load and you on the seat: the setup changes the beam angle.
- In the dark, on a road you know and without traffic.
- Correct the angle at the joint: the three brackets described are swivel-mounted precisely for this purpose, without bending anything.
- Check again after the first few kilometres that the screws and joints have not developed any play.

The mount first, then the spotlights, and finally the control
The purchase order avoids the most frequent surprise when opening the package: discovering that a piece is missing.
- Your motorcycle's mount: it determines where the lights will end up, which attachment it provides, and whether they will remain aligned.
- The auxiliary lights, chosen according to the lumen output and the type of clamp compatible with the mount. A complete comparison is available in the guide to the best motorcycle auxiliary lights of 2026.
- Wiring harness and control, which no bracket includes.
| Product | In the package | To be purchased separately |
|---|---|---|
| CWJ082 | 2 Ø 25 mm spacers, long-shank bolts | Auxiliary lights, wiring harness, relay, control |
| CDZJ251 | Swivel stainless steel bracket | Auxiliary lights, wiring harness, control |
| CWJ221 | Stainless steel bracket with Ø 22 mm tube, adapter bracket | Auxiliary lights, wiring harness, control |
| CLU081 | Lever with controller, 2 levers, wiring harness with quick connectors | Auxiliary lights (specified for L18) |

For the full range of LOBOO lights, visit the LOBOO lighting collection; if you also use the bars for other purposes, read what can be be mounted on crash bars.
Frequently asked questions about auxiliary light mounts
Why do auxiliary lights mounted with universal collars become misaligned?
Because a collar holds by friction around the tube, and vibrations reduce that friction. A dedicated mount is instead anchored to a hole, replacing an existing bolt: the auxiliary light is mechanically secured and cannot rotate.
Is it better to mount the auxiliary lights on the crash bars or under the headlight?
On the bars, the auxiliary light is better protected in a fall and illuminates the edge of the road well. Under the headlight assembly, the projection angle is better for seeing farther, but the position is more exposed in a frontal fall.
What diameter must the tube have to mount the auxiliary lights?
It depends on the auxiliary light clamp: there is no single standard size. 22 mm is very common and the LOBOO CWJ221 provides it, but DENALI makes clamps for 32 to 38 mm and 39 to 49 mm bars. Before buying, measure the tube's circumference and divide it by 3.14.
Do the auxiliary light mounts include the lights?
No. The mounts described are only the mechanical base: auxiliary lights, wiring, relays, and controls are purchased separately.
Do you need to drill the motorcycle to install a dedicated auxiliary light mount?
No. The dedicated LOBOO mounts described are attached to existing mounting points or replace existing bolts, and installation is reversible.
Which auxiliary light mount is available for the BMW R 1250 GS Adventure?
The LOBOO CWJ082 (€45, available on October 3, 2026): two Ø 25 mm pass-through spacers that mount on the original BMW crash bar of the R 1200 and R 1250 GS Adventure in place of the original bolt. The high CDJ082C bracket (€73) is out of stock.
Is the CDZJ251 bracket suitable for the KTM 1290 Super Adventure S?
No, according to LOBOO. The manufacturer lists it for the KTM 1290 Super Adventure R from 2022; the S version is not among the indicated models.
Does the CWJ221 bracket fit the KTM 890 Adventure?
LOBOO lists it for the KTM 790 Adventure and 790 Adventure R from 2019 to 2022. No other models are indicated: before ordering for an 890, ask us to verify with the make, model, and year.
Can I mount screw-on auxiliary lights on the CWJ221 bracket?
Yes. The package includes an adapter bracket that allows you to mount both lights with a 22 mm tube clamp and lights that attach with screws.
How do you control auxiliary lights without adding switches to the handlebar?
With a clutch lever that integrates the switch into its own body, such as the LOBOO CLU081 for BMW: it replaces the stock lever and places the ring under your thumb without taking your hand off the handlebar.
Is the CLU081 lever compatible with the BMW R 1300 GS?
No, not among the declared models. LOBOO lists it for the BMW R 1200 and R 1250 in the GS, GS Adventure, RT, RS, and R versions, as well as the K 1600 series.
Which auxiliary lights does the CLU081 lever work with?
LOBOO states this for the L18 auxiliary light, which is not included. The L18S version is currently in the Endurrad catalog: compatibility with this version is not stated by the manufacturer, so ask us to confirm before purchasing.
When should the auxiliary lights be aimed?
In the dark, with the motorcycle in riding position and the rider seated, preferably on a familiar road. Adjusting them in the garage by aiming at a wall almost always results in a beam that is too high or too far to one side.
In what order should you buy the mount, auxiliary lights, and control?
First, the mount for your motorcycle, which determines where the lights will end up and what mounting option it offers; then the auxiliary lights, chosen based on lumens and clamp type; finally, the wiring and control, which no bracket includes.
Can't find a mount for your motorcycle?
Tell us the make, model, and year: we will verify availability and the mounting type before you order, so the auxiliary lights and bracket arrive compatible. The catalog, orders, and support are also available in the Endurrad app for iPhone.
View LOBOO lighting


Share:
Crash bars: how to protect them and what you can mount on them
Motorcycle battery in winter: why it dies and how to keep it alive