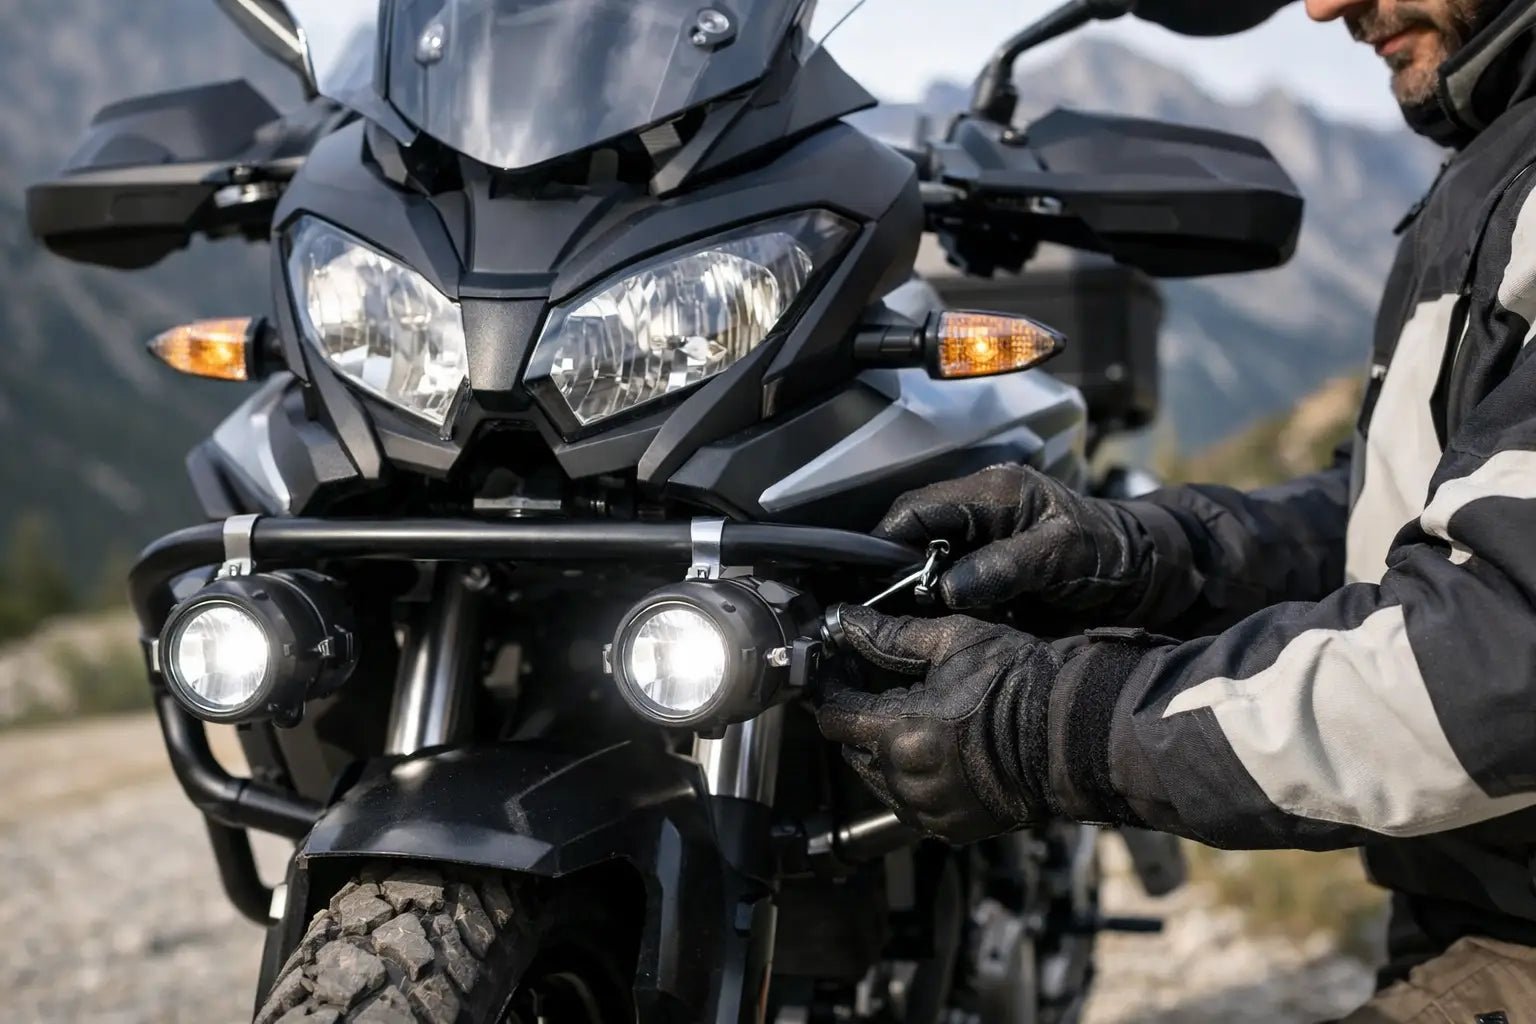
Mounting a set of auxiliary lights seems like a simple job, until you find yourself dealing with handlebar vibrations, overtightened wiring, or a light beam that illuminates the trees instead of the road. If you're wondering how to mount motorcycle fog light bars correctly, it's not just about attaching two brackets: where you install them, how you distribute the weight, and how neat the electrical system remains all matter.
On adventure and touring motorcycles, fog light bars are not just for adding light. They are a mounting base designed to provide stability for the lights, better protect them from vibrations, and keep them in a consistent position even when the bike is riding on dirt roads, potholes, or damaged asphalt. This is why correct mounting varies greatly between a BMW GS, an Africa Twin, a KTM Adventure, or a Ténéré: the principle is the same, but the spaces, fastening points, and interferences are never identical.
How to mount motorcycle fog light bars without mistakes
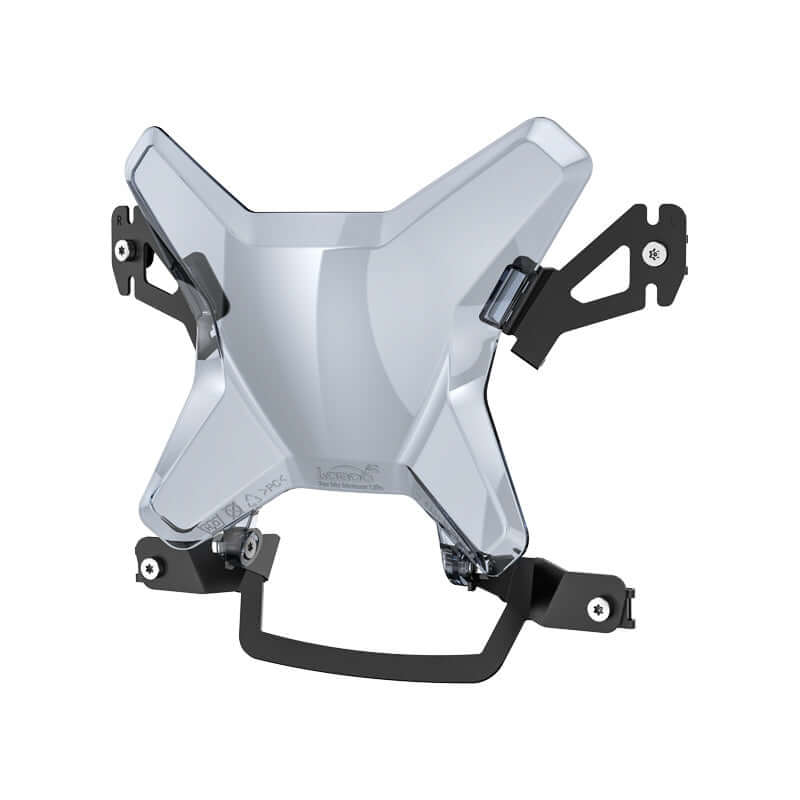
Before grabbing wrenches and Allen keys, one thing needs to be verified: actual compatibility with the motorcycle model. It's not enough for the bar to "fit." It must be designed to use structural fastening points, without stressing plastics, light frames, or supports not intended to withstand vibrations and additional weight.
On maxi enduros, mounting generally occurs in one of these areas: under the headlight assembly, on the front beak supports, in conjunction with the upper crash bars, or on a dedicated crossbar. The best choice depends on the use. If you do a lot of asphalt riding and touring, a high position improves passive visibility to other vehicles. If you're looking for a true fog light function, a lower mounting tends to work better in fog and rain, as it limits reflections towards the rider. On the other hand, a position that is too low exposes the lights more to stones, mud, and impacts.
Before final fastening, it's always advisable to do a dry run. Position the bar, check the fork travel, cable routing, distance from fender, fairing, and bodywork, and ensure there are no contacts when the steering is fully locked. This is the time to prevent real problems, not after.
Tools and work preparation
For a clean installation, you don't need a workshop, but you do need method and precision. Hex keys, correct size sockets, medium threadlocker, quality zip ties, protective sleeving for the wiring, and a torque wrench are essential. The torque wrench matters more than you might think: overtightening on aluminum supports or delicate threads is the quickest way to ruin a premium kit.
Before starting, the motorcycle should be positioned stably, preferably on a center stand or rear stand. If you need to work near the electrical system, disconnecting the negative terminal of the battery is good practice. It's not just caution: it prevents accidental shorts while routing cables and connectors.
Choosing the position and mounting geometry
A fog light bar must remain as symmetrical as possible to the motorcycle's axis. If it's even slightly out of alignment, the difference is immediately visible in the light beam and often also in vibrations. For this reason, the mounting should be done by initially only hand-tightening all bolts, without fully tightening them immediately.
Once the bar is in place, three aspects are checked. The first is horizontality. The second is the uniform distance from the fairings or crash bars. The third is mechanical clearance, meaning the absence of interferences during compression, steering, and oscillation of nearby parts. Only after these checks can progressive tightening begin.
If the kit includes spacers, they must be mounted exactly as specified. Many problems with cracks, bent brackets, or abnormal stresses arise precisely from inverted washers or forgotten shims. A well-designed kit works with precise tolerances: improvising here brings no advantages.
Correct tightening and vibration control
Tightening must be progressive and cross-pattern, especially if the bar uses two lateral fastening points. First, bring everything to abutment, then align, then tighten according to the torque specified by the manufacturer. If you don't have the exact data, it's better not to overtighten.
Medium threadlocker makes sense on a motorcycle that will experience vibrations, dirt roads, and many kilometers. However, it should not replace correct torque. If a support loosens, the problem is often not the absence of threadlocker but a stressed assembly or a support surface that is not perfectly flat.
After the initial mounting, a check after 100-200 km is always recommended. On adventure bikes, especially if the first kilometers include cobblestones, gravel roads, or uneven terrain, the components settle.
Wiring the lights on the bar
This is where an organized job differs from one that will cause problems at the first rain or first maintenance. The light cables must follow a protected path, away from heat sources, sharp edges, moving parts, and areas where the fork can pinch them.
The correct solution almost always involves relays, dedicated fuses, and separate controls, except for specific kits designed to interface with the motorcycle's original electronics. On recent models with CAN bus, improvising direct connections can create errors or abnormal behavior. In these cases, it's advisable to use compatible wiring or dedicated interfaces.
Cables should never be left dangling under the bar. They must be secured with zip ties at stable points, with minimal slack only where needed to compensate for steering movement. That slack must be controlled: too little pulls the connectors, too much creates chafing.
The switch also deserves attention. It must be reachable with gloves, but without forcing you to release your grip or get distracted. On touring motorcycles, real practicality comes before an aesthetically clean position.
Adjusting the light beam after mounting
Once the bars are installed and the lights are secured, the job is not finished. If the beam is poorly adjusted, you've spent time and components to worsen night riding. Fog lights must complement the main headlight, not overlap randomly.
For a sensible initial adjustment, the motorcycle should be placed on level ground, with an attitude as similar as possible to its use. If you often travel loaded with luggage and a roll bag, it's better to adjust taking that weight into account. An unloaded motorcycle and one ready for a long trip don't aim their lights the same way.
In general, lights mounted on a fog light bar should not project too high. The goal is to widen and fill the near and mid-range field of vision, improving road edge readability and terrain perception. If you aim them too far outward, you gain little and risk scattering light. If you close them too much, you create a central hot spot that is not very useful.
A real test should be done at night, on a dark and safe road. That's where you understand if the beam truly helps or if you are just producing more lumens without quality.
Common mistakes when mounting motorcycle fog light bars
The most frequent mistake is choosing the fastening point based on aesthetics. On an adventure motorcycle, function comes first: stability, protection, accessibility for maintenance, and absence of interferences. The bike's lines come second.
The second mistake is underestimating the overall weight. The bar, brackets, lights, and wiring may seem insignificant, but if they are all concentrated far forward, they have an impact. We are not talking about completely changing the setup, but on dirt roads and long transfers, a difference is noticeable.
The third is mounting everything without thinking about future maintenance. If you have to disassemble half the lighting system to remove a fairing or access a fairing screw, the job was not well designed. A touring motorcycle must remain easy to manage even far from the garage.
Then there's the issue of waterproofing. Exposed connectors, makeshift splices, or unprotected wiring are only acceptable until the first serious thunderstorm. And if you use the motorcycle all year round, that thunderstorm will come.
When it's worth doing it yourself and when not
If the kit is specific to your model, with dedicated brackets and well-designed wiring, mounting is within the reach of anyone with manual skills, adequate tools, and a minimum of experience. If, however, adaptations need to be made, the electronics are complex, or there is little working space, it's better to pause and evaluate.
It's not a matter of abstract skill. It's a matter of reliability. On a motorcycle designed to go anywhere, every accessory must work as part of the system, not as a precarious addition. This is why model-specific compatible kits remain the most sensible choice: fewer compromises, cleaner mounting, less time wasted correcting vibrations and interferences.
Anyone preparing a motorcycle for long trips knows this well: well-mounted accessories stop being noticeable. They work, they last, and they don't require extra attention. This is the result to aim for when installing a fog light bar: not just more light, but a motorcycle that is more ready, more readable at night, and more reliable mile after mile.
If you have doubts about compatibility or the best position, stop before the drill and zip ties. On the right motorcycle, with the right support, the correct mounting is barely visible. But on a trip, it's immediately felt.


Share:
How to mount a motorcycle GPS holder without mistakes
How to choose motorcycle pannier racks