

• Garagela tua moto e solo gli accessori compatibili
  • −5%Benvenuto nel Garage5% for anyone who saves the motorcycle in the app, until 06/30/2027
  • Cerca con una fotol'app riconosce la tua moto
  • Diario mototagliando, revisione, bollo
  • Avvisaminotifica quando un prodotto torna disponibile
  • −5%Primo ordinefatto dall'app
  • Vedi in 3De sulla tua moto, in realtà aumentata
Scarica su App Store Disponibile su Google Play Download

Free shipping on orders over €100 · 14-day returns
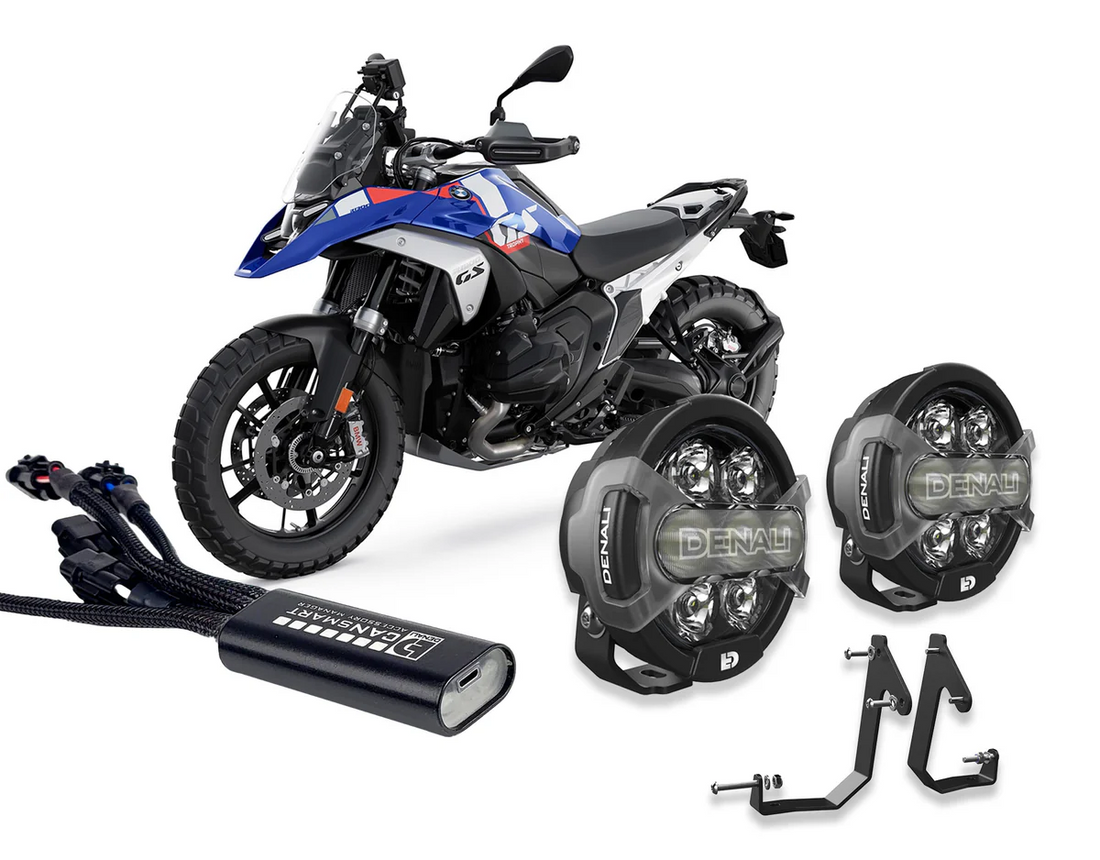
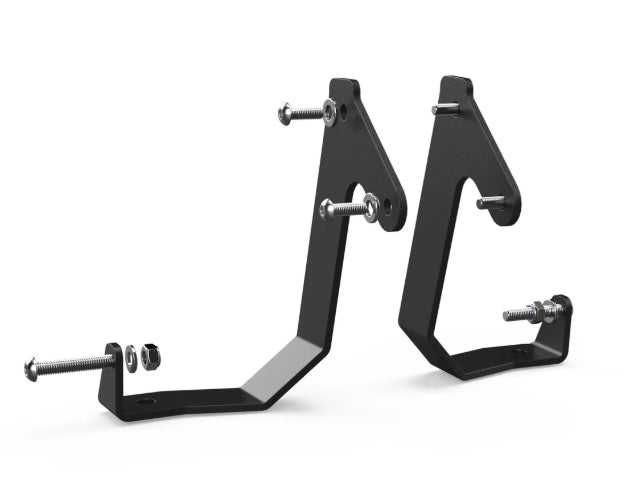
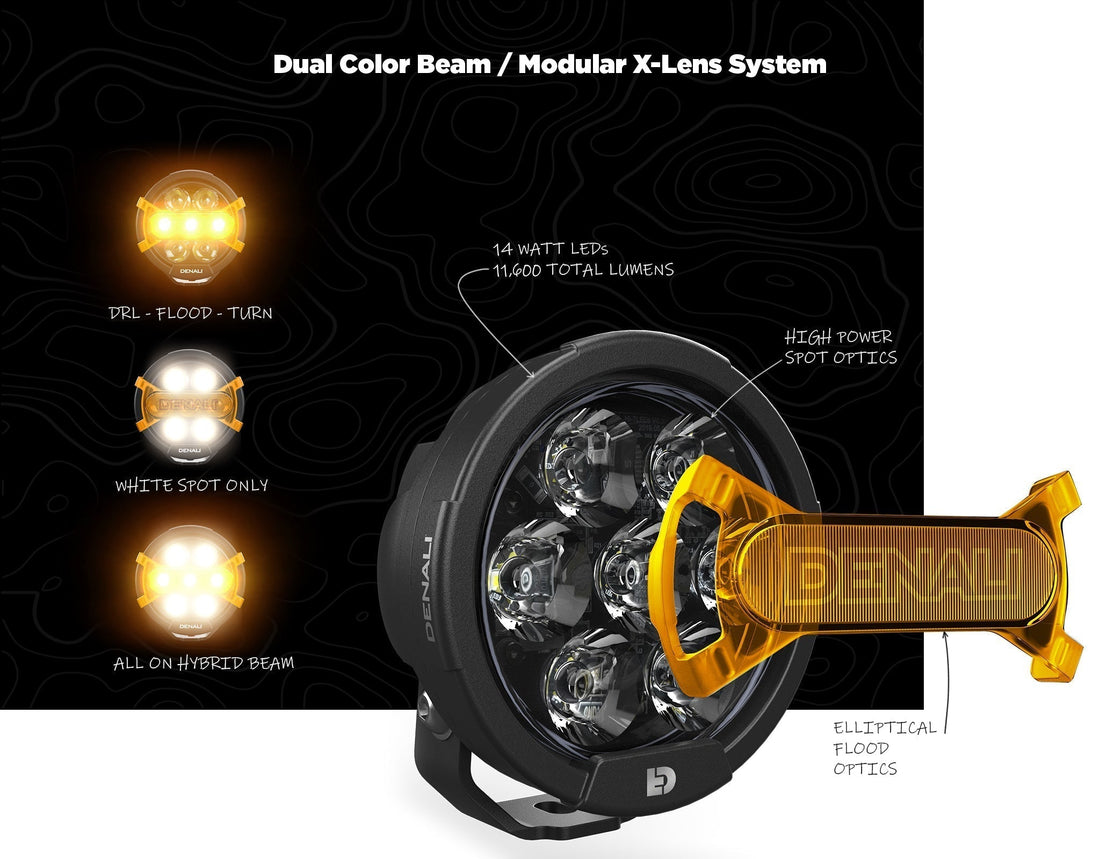
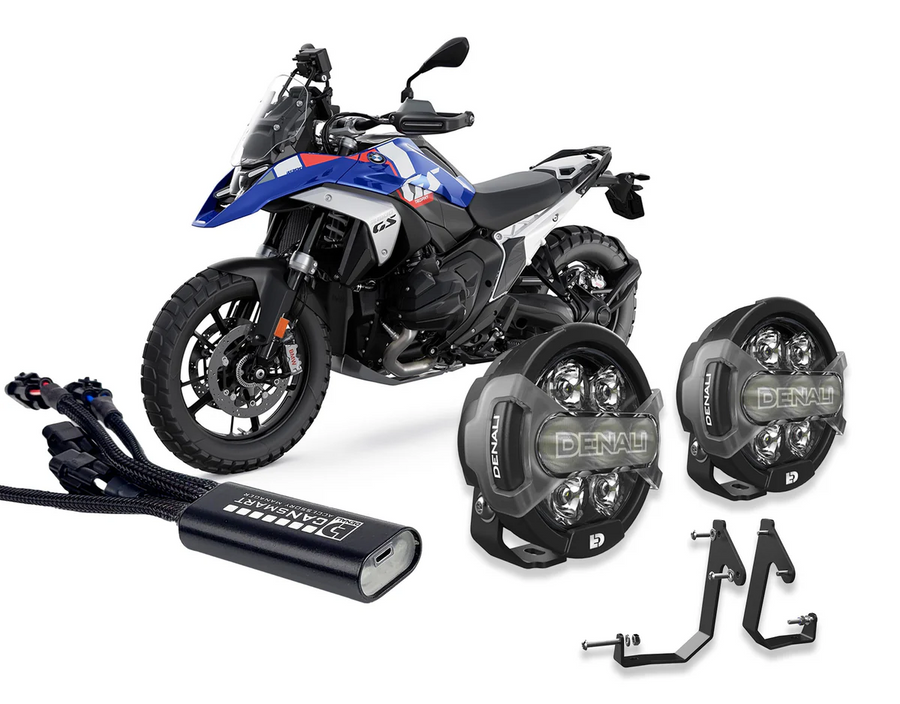
Faretti DENALI D7 PRO montati sulla BMW R 1300 GS con centralina CANsmartSupporto faretti DENALI per BMW R 1300 GSCentralina CANsmart GEN II DENALI per BMW R 1300 GSSistema di lenti X-Lens intercambiabili dei faretti D7 PRO DENALI
11.600 lm per spotlight Luminous flux
4 circuits 10 Each Control unit
Original buttons no switch added Command
R 1300 GS dedicated bindings Motorcycle

Panoramica

In breve

L'allestimento luci al massimo livello, già abbinato

È il vertice della gamma sulla moto più recente: i D7 PRO hanno doppio circuito indipendente, flood interno e spot esterno, entrambi dimmerabili, e le lenti X-Lens si cambiano a innesto rapido.

Sulla R 1300 GS l'abbinamento già fatto conta ancora di più: è una moto nuova, e la centralina giusta è quella dedicata a questo modello, non quella della generazione precedente. Attenzione anche alla versione: per la Adventure gli attacchi sono diversi ed esiste il kit dedicato.

Dal produttore DENALI

DENALI Electronics progetta illuminazione e sicurezza attiva per moto: faretti LED, moduli faro, clacson SoundBomb, indicatori e luci freno ausiliarie, e le centraline CANsmart che li integrano con l'elettronica della moto.

Codice Endurrad DNL07KIT005 — codice DENALI DNL.07.KIT.005.

Leggi la descrizione completa

Code DNL07KIT005 — DENALI code DNL.07.KIT.005

The top of the range for the BMW R 1300 GS: a pair of 11,900-lumen D7 PRO lights, each with model-specific mounts and a CANsmart GEN II control unit dedicated to the vehicle.

The D7 PRO lights feature two independent circuits — a central flood beam and an outer spot beam, both dimmable — and the X-Lens lenses can be changed with a quick-connect system. The control unit keeps them separate: the central visibility optics are synchronized with the turn signals, while the outer circuit is linked to the high and low beams.

On the R 1300 GS, the control unit connects to the 6-pin DWA alarm connector, which differs from the RDC connector used on previous generations: they are not interchangeable. Also pay attention to the version: the mounts are different for the Adventure, which has its own dedicated kit.

Nella confezione

  • 2 faretti D7 PRO (DNLD7P050) da 11.900 lumen ciascuno, con sistema di lenti X-Lens.
  • 1 centralina CANsmart GEN II (DNLWHS25900) per BMW R 1300 GS.
  • 1 supporto superiore dedicato (LAH0711600) per R 1300 GS.
  • Prolunghe cavi per il collegamento dei faretti alla centralina.

DNL07KIT005 · D7 PRO auxiliary lights · mounts and CANsmart included

How does it work, in detail?

The lighting setup at the highest level, already paired.

Spotlights, bracket, and control unit already paired
01

Spotlights, bracket, and control unit already paired

Pair of D7 PRO lights, upper mount designed for the R 1300 GS and model-specific CANsmart controller, plus cable extensions. Three pieces already compatible with each other: you don't have to cross-reference brackets, wiring and part numbers.

The mount has the same part number as the DL4 kit for this motorcycle: those starting with the DL4 and upgrading to the D7 PRO replace the lights and keep the mount.

On the R 1300 GS, the connector is different.
02

On the R 1300 GS, the connector is different.

The control unit connects to the 6-pin DWA anti-theft connector under the rear seat; the R 1200 and R 1250 instead use the 4-pin RDC connector. The control units are not interchangeable between the two generations.

There is also an exclusive safety feature: with the ignition on but the engine stopped, the auxiliary lights remain off, activate after two seconds of stable engine speed, and stay on for five seconds after the stop button is pressed. This is not a fault.

Three lenses included; you choose the beam.
03

Three lenses included; you choose the beam.

The X-Lens system can be changed using the quick-release mount, without tools: the kit includes clear, amber, and selective yellow lenses for each spotlight. Change the color and shape of the beam according to fog, rain, or a dry night.

With the amber lenses on the central optics, the control unit can make them flash in sync with the turn signals.

Scheda tecnica

Specifiche tecniche

Tutti i dati

Equipment

Kit structure
Pair of spotlights, model-specific mounts, and CANsmart controller for the vehicle Components already matched: nothing to choose and nothing to verify

Compatibility

Covered motorcycles
BMW R 1300 GS For the Adventure version, there is a dedicated kit with different mounting points

Equipment

Manufacturer’s warranty
5 years In addition to the 24-month statutory conformity warranty

Dati dichiarati da DENALI sulla scheda ufficiale.

Prima di ordinare

Montaggio e requisiti

Come si monta

Istruzioni complete e note di sicurezza

Ordine di lavoro. Prima la centralina, poi i faretti con i loro attacchi, e come ultima cosa il puntamento del fascio a moto rimontata.

Collegamento al CAN bus. Sulla R 1300 GS il punto di innesto è il connettore della centralina antifurto DWA, nel vano sotto la sella posteriore: si toglie la sella per accedervi. Si stacca il connettore dalla DWA o dal suo supporto, lo si innesta nel connettore maschio a 6 poli del CANsmart e si collega la femmina a 6 poli del CANsmart alla DWA. Il CANsmart resta quindi in linea fra cablaggio moto e antifurto. Attenzione: è un connettore diverso da quello delle R 1200 e R 1250, che usano invece il connettore RDC a 4 poli.

Collegamento dei faretti. Nella configurazione di fabbrica il filo rosso più lungo è il set luci uno e il bianco più corto il set luci due, 10 A per circuito, con fusibile principale da 30 A sull'unità. Si innesta la prolunga-sdoppiatore in uno dei due circuiti, si porta il cablaggio verso l'avantreno fissandolo al telaio con le fascette e stando lontani da ventola e sospensioni, poi si collegano i faretti ai connettori femmina a 3 poli. Dal retro di ogni D7 PRO escono due tratti di cavo: il più lungo è il circuito delle ottiche spot esterne, il più corto quello dell'ottica flood centrale.

Collegamento alla batteria. Si toglie prima il fusibile dal portafusibile, si scollegano i morsetti negativo e positivo, si collegano i terminali ad anello alla batteria — il filo arancione con il portafusibile va al positivo — e infine si rimette il fusibile. Conviene fissare il portafusibile in un punto raggiungibile senza smontare nulla.

Comportamento a motore spento. Non è un difetto: sulla R 1300 GS i due set di luci e il circuito abbigliamento riscaldato restano spenti con il solo quadro acceso. Si attivano dopo due secondi di regime stabile a motore avviato e, premendo il pulsante di arresto, restano accesi ancora cinque secondi. Spegnendo il quadro si spengono subito.

Montaggio e serraggio dei faretti. Ogni faretto ha la sua viteria M8; servono una chiave da 13 mm, una brugola da 5 mm e una da 3 mm a testa sferica. I pod vanno montati in verticale, perché è così che l'ottica centrale rigata produce il fascio corretto: se li monti capovolti, ruota la ghiera di 180° togliendo le quattro viti a brugola sul retro. DENALI indica 18 Nm sulla viteria M8, frenafiletti a media resistenza e un controllo del serraggio dopo i primi 50 km.

Puntamento del fascio. Metti la moto in piano con una persona in sella, a 7,6 metri da una parete verticale. Misura l'altezza da terra del centro dei faretti e traccia sulla parete una riga orizzontale 5 cm più in basso. Allenta le viti di fissaggio e della cerniera, porta il centro di ogni fascio sulla riga tenendo i due pod simmetrici rispetto all'asse della moto, poi richiudi.

Prima di richiudere. Gira il manubrio a fondo corsa da entrambi i lati e comprimi le sospensioni: nessun cavo deve andare in tiro.

Dati presi dai manuali ufficiali DENALI DNL.IM.WHS.25900 rev00 e DNL.IM.D7P.050 rev01.

DENALI riconosce 5 anni di garanzia convenzionale del produttore sui componenti di questo kit. Si aggiunge, e non sostituisce, i 24 mesi di garanzia legale di conformità previsti per legge.

Restano esclusi usura normale, abrasione, uso improprio, installazione errata, incidenti, modifiche e smontaggio dell'elettronica. Tagliare o modificare i cavi originali dei faretti o della centralina annulla la garanzia del produttore.

L'uso su strada pubblica dei fasci supplementari è regolato dal codice della strada del Paese in cui circoli: verifica sempre le prescrizioni locali su numero, posizione e accensione dei fari supplementari.

A chi ha appena preso la R 1300 GS e vuole montare le luci senza rischiare. Sulla moto nuova l'abbinamento conta più che altrove: la centralina giusta è quella dedicata alla R 1300, non quella della generazione precedente, e i supporti sono diversi da tutto il resto della gamma. Qui è già tutto accoppiato.

I D7 PRO hanno due circuiti indipendenti comandati separatamente dal CANsmart, e le lenti X-Lens trasparente, ambra e gialla sono comprese.

Se la tua è la R 1300 GS Adventure, gli attacchi sono diversi: c'è il kit dedicato.

Avvisami quando disponibile

Ti scriviamo appena Complete BMW R 1300 GS kit with D7 PRO auxiliary lights and CANsmart DNL07KIT005 torna disponibile.

Frequently asked questions

For more information, see our FAQ of frequently asked questions.

Is it better than buying the pieces separately?

Yes, on the price, but above all on the risk. A lighting setup on a GS brings together three things that need to match: the auxiliary lights, the correct mounts for that model, and the right control unit for that year. Getting one of them wrong means sending the package back and starting over. They’re already matched in the kit.

What difference does having the CANsmart in the kit make?

You control the spotlights using the buttons already on your handlebar, without adding switches. On BMWs, adjustment is done via the Wonder Wheel, and the control unit connects to the diagnostic socket without altering the original wiring. That’s the difference between an accessory that’s installed and one that’s integrated.

Can I assemble it myself?

Yes, if you’re comfortable with basic mechanics: there’s no need to cut or splice wires; everything plugs into the original connectors. Allow yourself a relaxed afternoon the first time, especially to route the wiring neatly under the tank.

Didn't find the answer you were looking for?

Do not hesitate to contact us