Guida alla scelta

Come funziona il sistema a sgancio rapido

Due parti: la presa resta fissata alla moto, la freccia si innesta con un clic e si toglie tirandola. Prima del fuoristrada le sganci e le metti nello zaino, per tornare su strada le rimetti.

Frecce

Kit da 2 o da 4

Il kit da 2 copre anteriore o posteriore, quello da 4 tutta la moto. Ogni freccia ha la sua presa, con cuffia e tappo contro acqua e fango.

Serve a chi monta il sistema per la prima volta

Attacco M10 · foro da 10 mm · omologate E-mark

Prese e frecce singole

Per completare il sistema

Una presa in più per predisporre una seconda moto, una freccia singola per sostituire quella persa. Le frecce sono asimmetriche: scegli il lato giusto.

Serve a chi ha già il sistema montato

Posteriore sx / anteriore dx · posteriore dx / anteriore sx

Resistenze

Contro il lampeggio veloce

Necessarie solo se la moto usciva di fabbrica con frecce a lampadina: senza, le frecce LED lampeggiano troppo veloci o non lampeggiano.

Serve a chi passa da lampadina a LED

Una resistenza per ogni freccia LED

La tua moto nasce con frecce a lampadina? Aggiungi le resistenze al carrello insieme alle frecce. Se invece ha già frecce LED di serie, non servono.

Presa per frecce a sgancio rapido

Tutto quello che devi sapere prima di ordinare

Compatibilità, contenuto della confezione, montaggio e dati tecnici: qui sotto ogni dettaglio ripreso dalle specifiche ufficiali CLICKnRIDE.

Descrizione Socket for Quick-Release Motorcycle Turn Signals, M10 Mount – Front

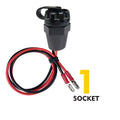
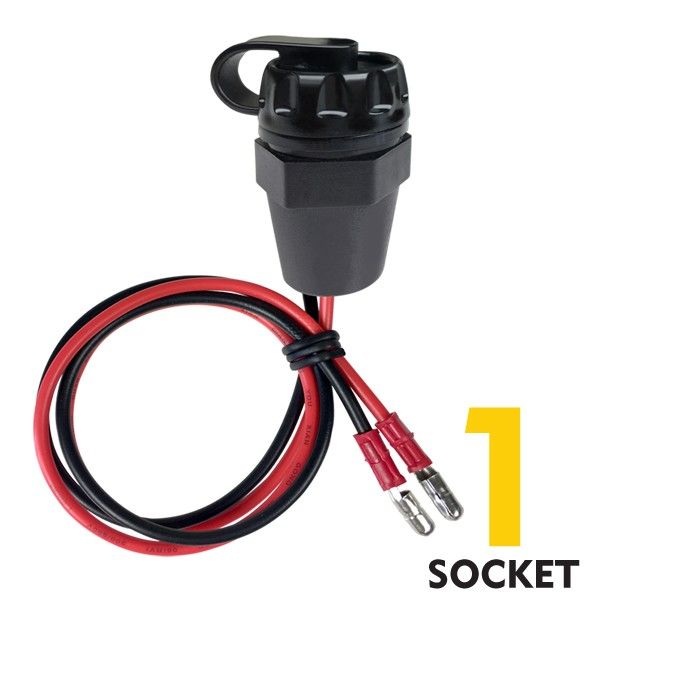
Socket for the Prima quick-release turn signal system: this is the part that remains attached to the motorcycle and into which the turn signal plugs. It is useful for replacing a damaged socket or preparing a second motorcycle and moving the turn signals from one vehicle to another.

Will it fit my motorcycle?

The fitting is universal. The socket fits into a 10 mm hole in a fairing, license plate holder, or bracket, with enough plastic or metal around it for the fastening nut (23 mm in diameter). It therefore fits almost all enduro, dual-sport, and adventure motorcycles: KTM, Husqvarna, GasGas, Yamaha, Honda, Kawasaki, Suzuki, SWM, and others. It accommodates Prima line turn signals.

What's included

  • 1 socket with wiring and dust cap

Features

  • Line: Prima
  • Fitting: universal M10 with anti-rotation nut
  • Required hole: 10 mm
  • Protection: rubber cap against water, mud, and dust

Installation

  1. Disconnect the battery.
  2. Insert the socket into the hole with the washer and spacers: the bottom of the nut notch must remain flush with the thread.
  3. Position the notch horizontally, plug in the turn signal to align everything, and hand-tighten from behind, using a drop of medium-strength threadlocker.
  4. Connect the red wire to positive and the black wire to ground.

We recommend having it installed by a workshop.

Perché sceglierlo

La presa è la parte che resta sulla moto. Averne una in più ti permette di predisporre una seconda moto e spostare le stesse frecce da un mezzo all'altro, oppure di sostituire una presa danneggiata senza ricomprare tutto il kit.

  • Attacco universale M10 con dado antirotazione.
  • Tappo antipolvere per chiuderla quando le frecce sono smontate.
A chi è consigliato
  • A chi ha già le frecce a sgancio rapido Prima e ha due moto.
  • A chi deve sostituire una presa rovinata da una caduta.
Scheda tecnica completa
  • Linea: Prima
  • Attacco: universale M10 con dado antirotazione
  • Foro richiesto: 10 mm, con spazio per un dado da 23 mm di diametro
  • Protezione: tappo in gomma contro acqua, fango e polvere
  • Garanzia del produttore: 2 anni
Montaggio e documenti
  1. Scollega la batteria e togli le frecce originali.
  2. Inserisci la presa nel foro da 10 mm con la rondella in nylon e i distanziali: il fondo della tacca del dado deve restare a filo con la filettatura. Così la freccia si innesta salda e non gira.
  3. Se la filettatura sporge poco, assottiglia la plastica della moto dall'interno con carta abrasiva o un utensile rotativo.
  4. Orienta la tacca in orizzontale, innesta la freccia per allineare tutto e stringi il dado a mano da dietro, con una goccia di frenafiletti medio.
  5. Collega il filo rosso al positivo e il nero a massa. Se la moto nasce con frecce a lampadina, aggiungi una resistenza per ogni freccia.
  6. Se la freccia non si accende, inverti rosso e nero: i LED sono sensibili alla polarità.

Attrezzi: chiave per il dado, spelafili e connettori o saldatore, frenafiletti medio. Consigliamo il montaggio da parte di un'officina.

Manutenzione: pulisci la freccia prima di innestarla; quando la togli, e quando lavi la moto, chiudi la presa con il tappo antipolvere.

Produttore

CLICKnRIDE è un marchio australiano (360 TWO Pty Ltd) che dal 2017 progetta frecce LED removibili a sgancio rapido per moto da enduro, dual sport e adventure. Nasce da un problema pratico: frecce spezzate a ogni uscita in fuoristrada. Oggi le frecce CLICKnRIDE sono vendute da oltre 270 rivenditori in Australia. In Italia sono distribuite da Forbikes.

Garanzia del produttore di 2 anni su difetti di materiale e lavorazione, con prodotto montato correttamente e usato in condizioni normali.

Domande frequenti

Presa per frecce a sgancio rapido: le risposte prima di ordinare

How many outlets do I need?

One for each turn signal mounted on the motorcycle. With two sockets per side on two different motorcycles, you can move the same set of turn signals from one vehicle to the other.

Which motorcycles can they be installed on?

On almost all of them. The socket mounts in a 10 mm hole on a panel, license plate holder, or bracket, with enough material around it for the 23 mm fastening nut. Workshops that install them have fitted them on KTM, Husqvarna, Yamaha, Honda, Kawasaki, Suzuki, BMW, and SWM bikes, from specialist enduro models to adventure bikes. The turn signal wiring is already present on every road-legal motorcycle.

Can I wash the motorcycle with the outlets installed?

Yes. Remove the indicators and cover the connectors with the dust cap so water and dirt do not get into the contacts. Before reinstalling the indicators, make sure they are clean.

After installation, the turn signals don't light up: what should I check?
  • If the motorcycle had bulb-type indicators, check that you connected the resistors.
  • Swap the red and black wires: LEDs are polarity-sensitive, and each manufacturer uses a different connection. Trying this will not damage either the motorcycle or the indicators.
  • Check that the indicator is fully inserted and that the spacers bring the thread flush with the nut’s notch.
  • Test the indicator on another socket, or connect it directly to a 12 V battery, to determine whether the problem is with the indicator or the electrical system.

Non trovi la risposta? Scrivici o consulta le FAQ sugli accessori.

Guide all'acquisto, confronti tecnici e novità sugli accessori per moto adventure

Prima di scegliere

View all

Piastra top case LOBOO JPT131WA montata sul portapacchi originale della BMW R 1300 GS

Motorcycle top case plate: which one to choose to mount the top case on your motorcycle

In brief. An aluminum top case does not attach directly to the motorcycle: it requires a top case plate, the interface connecting the luggage rack (standard or added) to the bottom of the top case. On Endurrad, you can find...

Read moreabout Motorcycle top case plate: which one to choose to mount the top case on your motorcycle

Honda XL750 Transalp 2026 in azione

Honda XL750 Transalp 2026: E-Clutch becomes standard, here’s what changes

From 2026, the Honda XL750 Transalp comes with the E-Clutch as standard on both versions, full-power and A2, at the same price of €10,990. Official technical specifications, what really changes, and how to equip it for touring with Endurrad catalog accessories.

Read moreabout Honda XL750 Transalp 2026: E-Clutch becomes standard, here’s what changes

Maxi enduro con numero di gara su una strada bianca dell'Appennino tra boschi autunnali durante il Transitalia Marathon

Transitalia Marathon 2026: stages from Rimini to Termoli, rules and how to prepare the motorcycle

From September 25 to October 1, 2026, from Rimini to Termoli in four stages and over 1,000 km: dates, route, Complex, Plain and Road tracks, costs, permitted motorcycles, luggage rules, and a complete checklist for preparing the maxi enduro.

Read moreabout Transitalia Marathon 2026: stages from Rimini to Termoli, rules and how to prepare the motorcycle